[Lesson 3] << [Contents] >> [Lesson 5]
In previous lesson, we have learned how to design the user interface by adding controls to the form and changing their properties. However, the controls on user interface alone will not work without adding code to them. In this lesson, we shall learn how to write code for all the controls so that they can interact with events triggered by the users. Before learning how to write Visual Studio 2013 code, let us dwell into the concept of event-driven programming
4.1 The Concept of
Event-Driven Programming
Visual Studio 2013
is an event driven programming language because we need to
write code to response to certain events triggered randomly by the user via
the controls on the form. These events do not occur in a certain order. The
events usually comprises but not limited to the user’s inputs. Some of the
events are load, click, double click, drag and drop, pressing the keys and
more.
Every form and and every control you place on the form has a set of events related to them. Some of the events are load, click, double click, drag and drop, pressing the keys and more. To view the events, double-click the control (object) on the form to enter the code window. The default event will appear at the top part on the right side of the code window. You need to click on the default event to view other events associated with the control. The code appears on the left side is the event procedure associated with the load event. Figure 4.1 illustrates the event procedure load associated with the default form .

Figure 4.1: Events associated with Form
Figure 4.2 shows the events associated with button

Figure 4.2
4.2 Writing the Code
MsgBox( “Welcome to Visual Studio 2013 ”)
Public Class Form1Private Sub Form1_Load(ByVal sender As System.Object, ByVal e As System.EventArgs) Handles MyBase.Load
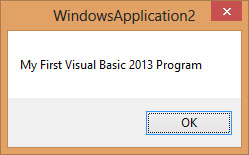
MsgBox( “My First Visual Studio 2013 Program”)
End Sub
End Class
When you run the program, a message box display the text “My First Visual Studio 2013 Program” will appear, as show in Figure 4.3. MsgBox is a built-in function in Visual Studio 2013 that display a message in a pop-up message box.
 Figure
4.3
Figure
4.3
* You will notice that above Private Sub structure there is a preceding keyword Public Class Form1. This is the concept of an object oriented programming language. When we start a windows application in Visual Studio 2013 , we will see a default form with the name Form1 appears in the IDE, it is actually the Form1 Class that inherits from the Form class System.Windows.Forms.Form. A class has events as it creates an instant of a class or an object.
You can also write code to perform arithmetic calculation. For example, you can use the MsgBox and the arithmetic operator plus to perform an addition of two numbers, as shown below:
Private Sub Form1_Load(sender As Object, e As EventArgs) Handles MyBase.LoadMsgBox(“2” & “+” & “5” & “=” & 2 + 5)End Sub
*The symbol & (ampersand) is to perform string concatenation.
The output is as shown in Figure 4.4
 Figure
4.4
Figure
4.4
If you wish to close the window after the message, you can add the statement Me.Close(), as follows:
Private Sub Form1_Load(sender As Object, e As EventArgs) Handles MyBase.Load
MsgBox(“2” & “+” & “5” & “=” & 2 + 5)
Me.Close
End Sub
We will learn more about code writing in coming lessons