Visual Studio 2013 Lesson 6: Working with List Box and Combo Box
[Lesson 5] << [Contents] >> [Lesson 7]
In previous lesson, we have just mastered the usage of text boxes and labels in Visual Studio 2013 . In this lesson,we shall learn two more important controls, the list box and the combo box. Both controls are used to display a list of items. However, they differ slightly in the ways they display the items. The list box displays the items all at once in a text area whilst combo box displays only one item initially and the user needs to click on the handle of the combo box to view the items in a drop-down list.
6.1 List Box
6.1.1 Adding Items to a List Box
To demonstrate how to add items at design time, start a new project and insert a list box on the form. Right-click on the list box to access the properties window. Next, click on collection of the Item property, you will be presented with String Collection Editor whereby you can enter the items one by one by typing the text and press the Enter key, as shown in Figure 6.1 :
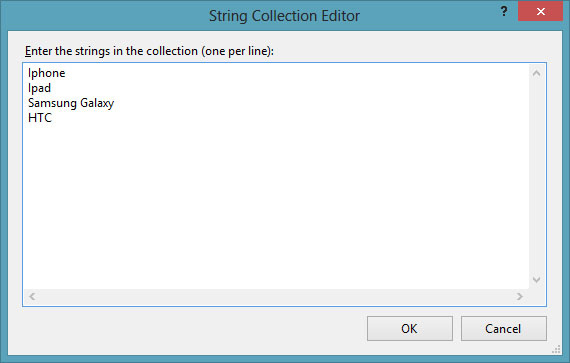
Figure 6.1: String Collection Editor
After clicking on the OK button, the items will be displayed in the text box, as shown in Figure 6.2
Items can also be added at runtime using the Add( ) method. Before we proceed further, we need to know that Visual Studio 2013 is a full fledged object oriented programming language. Therefore, Visual Studio 2013 comprises objects . All objects have methods and properties, and they can are differentiated and connected by hierarchy. For a list box, Item is an object subordinated to the object ListBox . Item comprises a method call Add() that is used to add items to the list box. To add an item to a list box, you can use the following syntax:
ListBox.Item.Add(“Text”)
For example, if you wish to add a new item to ListBox1 above, you can key-in the following statement
Private Sub Button1_Click(sender As Object, e As EventArgs) Handles
Button1.Click
ListBox1.Items.Add(“Nokia”)
End Sub
The item “Nokia” will be added to the end of the list, as shown in Figure 6.3
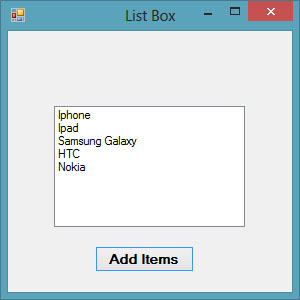
Figure 6.3
You can also allow the user to add their own items using the InputBox function, as follows:
Private Sub Button1_Click(sender As Object, e As EventArgs) Handles
Button1.Click
Dim myitem
myitem = InputBox(“Enter your Item”)
ListBox1.Items.Add(myitem)
End Sub
* The keyword Dim is to declare the variable myitem. You will learn more about variables in coming lessons
6.1.2 Removing Items from a List Box
To remove items at design time, simply open the String Collection Editor and delete the items at line by line or all at once using the Delete key.
To remove the items at runtime, you can use the Remove method, as illustrated in the following example. In this example, add a second button and label it “Remove Items”. Click on this button and enter the following code:
Private Sub Button2_Click(sender As Object, e As EventArgs) Handles
Button2.Click
ListBox1.Items.Remove(“Ipad”)
End Sub
The item “Ipad” will be removed after running the program. You can also let the user choose which item to delete.
To clear all the items at once, use the clear method, as illustrated in the following example. In this example, add a button and label it “Clear Items”
Private Sub Button3_Click(sender As Object, e As EventArgs) Handles
Button2.Click
ListBox1.Items.Clear()
End Sub
6.2 Combo Box
In Visual Studio 2013 , the function of the Combo Box is also to present a list of items where the user can click and select the items from the list. However, the user needs to click on the handle(small arrowhead) on the right of the combo box to see the items which are presented in a drop-down list.
6.2.1 Adding Items to a Combo Box
In order to add items to the list at design time, you can also use the String Collection Editor. You will also need type an item under the text property in order to display the default item at runtime.
Figure 6.4

Figure 6.5
After clicking the handle of the right side of the combo box, the user will be able to view all the items.
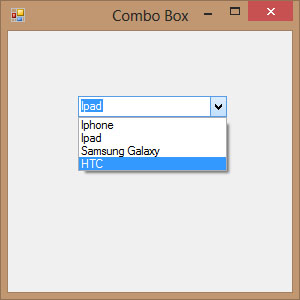
Figure 6.6
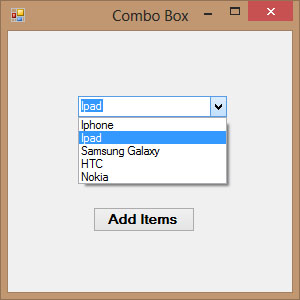
Besides, you may add items using the Add() method. For example, if you wish to add a number of items to Combo box 1, you can key in the following statement
Private Sub Button1_Click(sender As Object, e As EventArgs) Handles
Button1.Click
ComboBox1.Items.Add(“Nokia”)
End Sub
 Figure
6.7
Figure
6.7
You can also allow the user to add their own items using the InputBox function, as follows:
Private Sub Button1_Click(sender As Object, e As EventArgs) Handles
Button1.Click
Dim myitem
myitem = InputBox(“Enter your Item”)
ComboBox1.Items.Add(myitem)
End Sub
6.2.2 Removing Items from a Combo Box
To remove items at design time, simply open the String Collection Editor and delete the items at line by line or all at once using the Delete key.
To remove the items at runtime, you can use the Remove method, as illustrated in the following example. In this example, add a second button and label it “Remove Items”. Click on this button and enter the following code:
Private Sub Button2_Click(sender As Object, e As EventArgs) Handles
Button2.Click
ComboBox1.Items.Remove(“Ipad”)
End Sub
The item “Ipad” will be removed after running the program. You can also let the user choose which item to delete.
To clear all the items at once, use the clear method, as illustrated in the following example. In this example, add a button and label it “Clear Items”
Private Sub Button3_Click(sender As Object, e As EventArgs) Handles
Button2.Click
ComboBox1.Items.Clear()
End Sub